Vintage Cameras
Over the past year or so, I’ve been putting together a collection of vintage cameras. I don’t view them as any kind of “investment.” I enjoy cleaning them up and making minor repairs when they need them. They look neat, too.
A few of them aren’t really fit to be used any more, but most of them are fully functional. Finding film for them is often a different story, though. One of these days I’ll actually use one of them to take some shots.
Keystone B-1
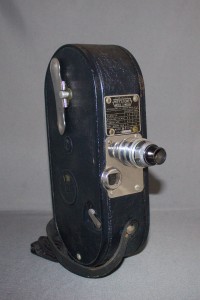 I received a package on Monday, 18 November 2013, that contained a Keystone B-1 16mm movie camera. I had purchased the camera on eBay on the Friday before. The shipping cost was $8.85, while the camera itself only cost 99¢. Yes, vintage cameras are often available at extremely low prices.
The B-1 was manufactured by the Keystone Camera Company beginning in 1936. It uses 16mm film on 100 foot reels which are 3.6 inches (9.15cm) in diameter. Keep in mind that a 100 foot reel of film shot at eighteen frames per second (18fps) only runs for three minutes and forty-two seconds.
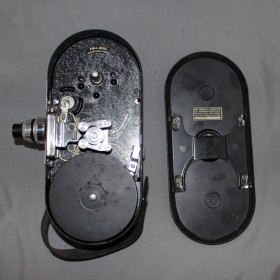 The camera’s body is 9″ (23cm) tall, 4″ (10.5cm) wide, and 2.25″ (6cm) thick. It weighs about 4.5 pounds (2.05kg). The lens is a C-mount Ilex Cinemat, F:3-5, E.F. 1″.
Like most consumer movie cameras prior to the 1950s, this camera uses a spring-wound clockwork motor to drive the shutter and film reels. That’s the first thing I tested when I got it out of the box, of course. Though it seemed a bit sluggish at first, it does run.
I made a video recording of the shutter (with the lens removed) operating. The recording was made at 60fps, then I slowed it down to 20fps. At one-third speed, the sluggishness of the timing can be heard. Yes, it does sound like a sewing machine at this speed.
The Cover
The first problem that I noticed with this camera was that the cover didn’t seem to latch properly. The D-ring on the cover is supposed to rotate about 90° between the locked and unlocked positions. When I received the camera, however, it would only rotate about half that much toward the “closed” position.
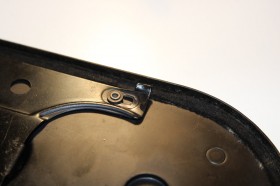 The inside of the cover revealed how the locking mechanism works, and how it was damaged. The D-ring rotates a cam that slides a plate up and down inside the cover. That plate has four tabs on it that slide behind four tabs on the camera body to lock it in place. Two of the cover’s tabs were bent up, preventing the plate from sliding all the way to the locked position, as well as leaving the cover a bit loose.
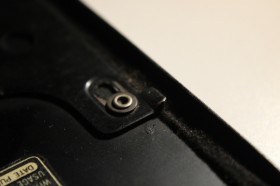 I straightened the bent tabs by holding a small steel block against the tabs while striking the block with a hammer. It didn’t turn out perfectly flat, but it improved it enough so that the locking mechanism fully closes. The cover also fits more tightly now, preventing any light from leaking into the film chamber.
The Lens
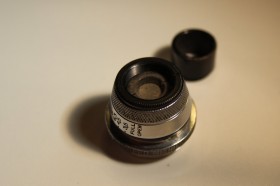 The next issue that I noticed had to do with the primary lens. The dust and dirt was easy enough to deal with, but the iris inside the lens didn’t seem to move. The ring used to adjust the aperture turned all the way around, not stopping at the maximum and minimum settings as it should. I’d never taken apart a lens iris before. I don’t let things like that prevent me from learning, though.
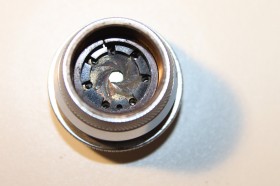 Removing the lens “hood” and the front lens element allowed me to access the iris mechanism. There’s a retaining ring which holds down the ring which is supposed to rotate about 45° to adjust the aperture. The notches in that ring should line up with the round holes with raised edges in the iris leaf elements below it. It appears that the retaining ring had slipped, allowing the adjustment ring to lift out of position.
To be honest; I was sort of reticent to disassemble it any further. I don’t really have plans to use this camera for its original purpose. If the lens was damaged, it wouldn’t make the camera of less use to me. That being the case, it wouldn’t matter if I damaged it further by taking it apart.
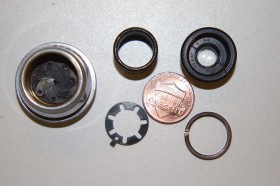 Removing the retaining ring wasn’t too difficult. I’ve got a set of small picks that work great for that sort of thing. The adjustment ring then came out easily.
The iris is composed of seven hinged leaves which pivot in unison to adjust the size of the aperture. The pivoting end of each of these leaves appeared to be working well. The other ends have a small hole punched through from the underside, leaving a raised edge to fit the adjustment ring’s notches. Not visible in the photos is a slot in the side of the assembly which accommodates the tab on the outer edge of that ring. It describes the 45° rotation limits for the aperture adjustment.
Reassembling everything provided a little bit of intricate work. I had to use a small pick to position all of the iris leaves before inserting the adjustment ring in the appropriate position for that aperture. First, I set the outside adjustment ring almost to the smallest aperture (f/16). 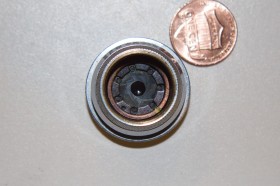 Next, I positioned the iris leaves so that they formed a tiny aperture while their free ends were equally spaced around the circle. I then positioned the outside tab of the adjustment ring so that it was at the far end of the slot in which it turns. I had to make very tiny adjustments to each of the leaves in order to get them to match up to the slots in the ring. Once that ring was seated in place, I carefully pushed the retaining ring into the assembly. Threads on the inside of the assembly hold the retaining ring in place.
The outer lens and hood simply thread on to the rest of the assembly. Of course, I cleaned them a bit, first. It’s amazing how much dust can collect on these things. I held the lens up to the light as I turned the outer adjustment ring and was very pleased to see the aperture dilating and contracting as it was supposed to. It works! Never let the simple fact that you’ve never done something before be the sole reason for not trying to do it.
What Else?
What else do I intend to do with this camera? I still need to clean and polish some of it, to make it look nice and shiny. I could open up the clock drive to clean and lubricate it. Since I really don’t plan to photograph with it, though, I think I’ll leave that part alone. I need to build a small base for it: The rounded bottom doesn’t allow it to stand on its own. It has a threaded base to fit a tripod, so I can construct a base to fit that. Once that’s done, I can put it up on the shelf with my other cameras, or use it for a bookend, or… Who knows?

5 comments
Skip to comment form
Figured I would learn something about your blog instead of returning your ill-informed insults.
Author
Learn away! It will probably do you some good!
Hello, I have a Keystone 16 mm model A7 Movie Camera and I want to find the film thaht goes in it.
Can you tell me where to find those film,
Thank you
Author
Hi Claudette,
B&H Photo carries both 8mm and 16mm movie film, though it’s a bit expensive. You can find it here: https://www.bhphotovideo.com/c/buy/Movie-Film/ci/341/N/4093113313
Processing the exposed film can also be rather expensive, and it isn’t the sort of thing that your local camera shop is likely to do. Spectra Film & Video does processing of lots of types of movie film. You can find their rates listed here: http://www.spectrafilmandvideo.com/Lab.html
Good luck!
Does this camera have a single-frame provision?